
How to make your own natural Christmas decorations straight from the garden

Decorating the home for Christmas can make a lovely family ritual. While it’s fun using the box of twinkly tinsel and baubles retrieved from the loft, the Christmas holidays are a wonderful opportunity to get outside, check how plants are faring and gather interesting specimens to bring indoors.
Whether you invite along parents, siblings, children or grandchildren, try to get everyone engaged in the picking as well as the creating of displays; it’s often the simplest tasks which are done together each year that build the fondest memories.

Alongside a pair of sharp secateurs, it’s worth having a large basket and some thick gardening gloves to protect against thorns. If you take the time to analyse plants in detail during the winter, you will gain a greater understanding of which ones hold themselves well against the elements, what colour combinations work best and how they catch the light.
Look out for glossy leaves and berries, fluffy seed heads and sculptural, skeletal forms. No doubt you’ll find that nature can provide a unique, albeit subtle, sparkle all of its own.
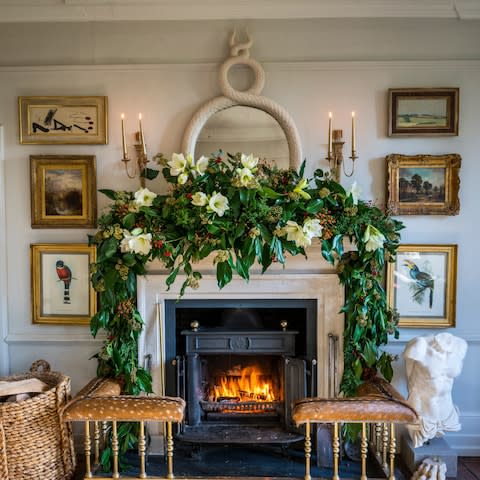
A swag for a fireplace
The swag around the fireplace is composed of three pieces, the central part that sits on the mantelpiece and the hanging parts either side of the fire. For the central portion we measured the length of the mantelpiece, cut a thin plank of wood to size and used this to support the decoration.
Method
Soak three Oasis bricks and cover with thick aluminium foil (to prevent water leaking out). Glue and tie them to the wooden plank. Using a wooden base makes the arrangement more stable and allows the somewhat messy process of building the decoration to be carried out elsewhere. Place it in position when nearly finished.
Cover the bricks with a loose cushion of foliage from the mossy textured cypress, Chamaecyparis pisifera ‘Squarrosa’, and then add in the larger sprigs of tree ivy, Hedera colchica ‘Dendroides’. This provides volume, the large leaves contrast well with the cypress foliage and are a smart foil for flowers and berries. Once the body is formed, decorate with snippets of holly and trusses of rose hips.
When making the drops for either side of the fireplace, measure the two sides and top of the fireplace and cut a piece of thickish rope to size. You will only decorate the vertical lengths, as the middle section of the rope will sit behind the central portion.
Start at the bottom of the rope and work up, with each conifer twig hanging over its predecessor. Secure the twigs with florists’ wire and then a dab from the glue gun. Once you have covered the rope, add the ivy in the same overlapping manner. Last, add the holly and rosehips.
If assembled elsewhere, put the sides in first, push the top horizontal rope to the back of the mantlepiece, then add the central portion – it will need titivating once it has been installed, so have a few extra sprigs to hand.
The evergreens and berries will last for a few weeks in a moderately heated house before they start to lose shine. For special occasions, thread fresh flowers through the foliage – we used the white amaryllis ‘Mont Blanc’.
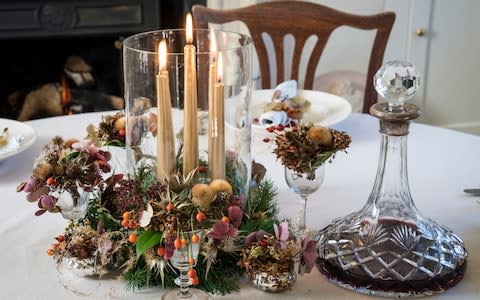
Table decorations and napkins
For the table centrepiece we used a large glass vase to hold four golden candles and encircled it with a mix of small antique glasses of varying heights filled with miniature posies.
Method
Put the candles in low candle holders and arrange in the vase, then snip small cuttings of conifer leaves to cover the base inside the vase. Arrange a circle of slightly larger conifer leaves around the outside of the vase then add in a few thistle-like Eryngium giganteum seed heads, sprayed gold to give added sparkle.
Make tiny bunches of dried hydrangea flower heads, tassels of tawny miscanthus grasses, various small seed heads, and sprigs of orange rosehips (we used some from the rambling rose ‘Toby Tristam’), then wrap the stems tightly with paper-covered wire to hold everything together.
Snip off the stems so that the miniature posies sit neatly in the small glasses. These serve as a sort of “nature table” in miniature to be appreciated close-up.
To decorate napkins, use smaller posies of a similar combination of plants, held with a twist of paper-covered wire. Tie loosely in place with dark-red silk ribbon.

Note: candlelight is magical, but bear in mind the highly flammable nature of dried plants.
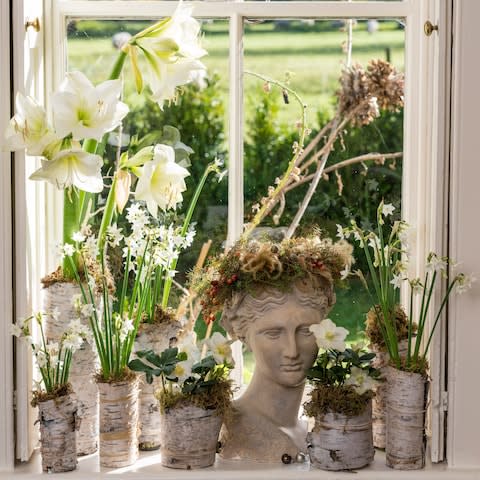
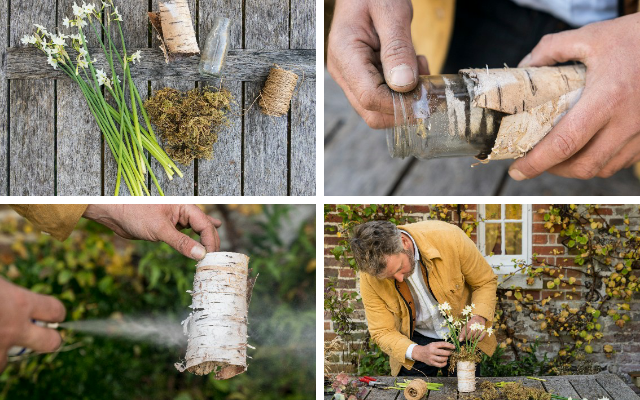
Birch pots and vases
Look for old, fallen silver birch trunks with the bark in good condition. When the wood inside has started to rot, it’s easier to skin the bark away – but make sure the bark isn’t too thin or brittle. Ideally, it should be about 1mm thick, clean looking, with good markings. Once the bark is free, carefully rub its surface to remove any debris or loose matter.
Method
Measure the height of your chosen glass jar or flower pot and, using a Stanley knife, cut a strip of bark to the same depth. Ideally, the bark should wrap around the receptacle and overlap at the back.
Roll the birch tightly around the jar or pot, and secure with a length of pale-coloured raffia. To finish, lightly spray the bark with white paint to lift the whiteness (we like the effect of chalk line marker paint as it’s light with a powdery finish).
Insert your chosen winter-blooming plants or flowers (we used hellebores and forced paperwhite narcissi) into the pots. In the case of plants actually growing in pots, we put freezer bags around them first to retain moisture.
Use a generous topping of moss to decorate the top of the pot and cover soil. It also retains moisture. These are temporary displays only, but when watering plants ensure they don’t become waterlogged.
A festive flower crown
It’s fun to decorate any sculpture you may have around the house or garden with a festive flower crown (or if you’re feeling adventurous you could try to persuade your guests to wear them rather than the usual paper crowns from crackers). We used tufts of the golden grass Miscanthus nepalensis, which catch the light beautifully, with orange rose hips from ‘Toby Tristam’, seed heads from ox eye daisy (Telekia speciosa), interspersed with fronds of Japanese cedar Cryptomeria japonica ‘Elegans’.

Method
Measure the head of the piece for which you’d like to create a crown. Make a base by using several strands of thin aluminium wire to form a hoop of the same size, and twist the ends together to hold everything tight.
Gather sprigs of your chosen plants and twist florists’ wire tightly around the stems to hold the cluster together firmly. Make up enough sprigs to encircle the crown and wire these to the base, interspersing them with sprigs of evergreen foliage.
Spray a few seed heads of a small teasel (Dipsacus pilosus) with gold and use these to fill any remaining gaps.
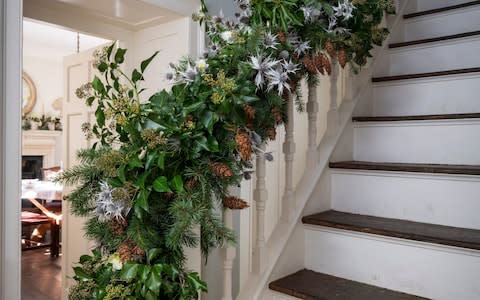
A swag for a staircase
This swag needs a lot of foliage, and making it can be a lovely way to bring the family together – send everyone out into the garden to gather evergreens and then sit them down to help make the bunches needed to clothe the swag. Conifers make a good base; we used Douglas fir (Pseudotsuga menziesii) but use whatever you have available.
Method
Make thick bunches of fir about 12in (30cm) long, by tightly wiring 3-5 shoots together. Then fix the bunches with florists’ wire to a piece of rope the length of your staircase banister; each bunch should overlap and face the same direction.
To attach bunches, wire at the top and in the middle of each and glue gun them to prevent slippage. Once the rope is covered, attach it to the staircase banister (it helps to have a few people to help with this) with the tips pointing down.
We use Flexi-Tie to attach it to the banister (it doesn’t slip or dig in). Then embellish with whatever you have in the garden – we used the large tree ivy foliage to contrast with the conifer and poked seed heads of Eryngium giganteum (sprayed white, left), and the flowers of the Christmas rose (Helleborus niger), through the foliage.

